
Ellen's 3 Step Ladder
10/24/2010 10:35 AM Filed in: Ladders
This is another in my “catching up” series! This project is posted 7/24/2011. The work was done in October 2010 - March 2011.
I guess you could say that this project began with a showing at the Piedmont Craftsman’s Fair. I was fortunate enough to be invited to join this group of exhibiters after a jury process. The client saw my work there and wanted a step ladder for her library. (I have one photo of the ladder she saw there. You can see it in the gallery - scroll down to “Step Ladder”, not “Ellen’s Step Ladder” to see what she saw at the show). I had two ladders exhibited at the show and both had already sold but I told her I’d be happy to build another for her. That suited her well as she wanted to change the design a bit. That suited me well as I am always happy to let a design evolve to fit a client’s desire/whim/expectation.
So, after ironing out a few details, work began with photo tour of the room in which the ladder was going to live. In this case it was a library with beautiful hand-rubbed mahogany panelling. Dentils lined the top of the panels. There were also photo’s of some of the furniture in the room. I was able to draw some inferences from all of these elements. It is a beautiful room and I am excited to be able to add a piece of furniture into it.
Now we needed to get down what kind of changes she wanted to make. I knew that she wanted to “tame up” some of the lines of the top (the handle). To keep the piece internally harmonious, I knew that would mean some changes to the bottom as well. So, I submitted these drawings to get things started.
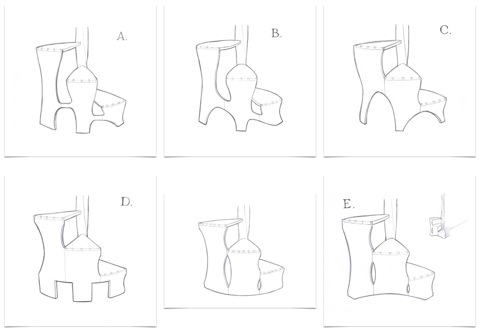
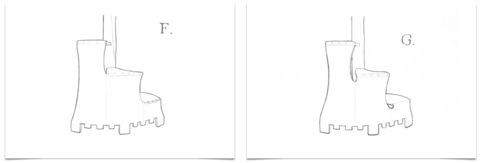
She gravitated toward sketch “D” but before we moved on, I wanted to see if a more literal translation of the dentils would be any more appealing (“F” and “G”). The larger, less literal interpretation of the dentils (“D”) won the day and that’s what we went with. Sometimes you have to push past an idea before you realize you had it right in the beginning. (at least sometimes _I_ do!).
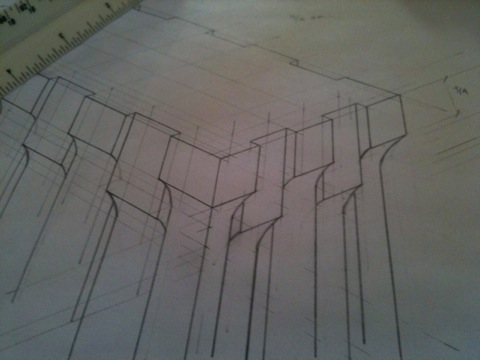
I kind of got the imagery of a rook or castle on a chess board from this sketch (“D”). When I shared this with Ellen, she concurred and kind of liked that imagery. Playing on this idea, I came up with a design for the top of the upright or the handle:
...and with this in hand, I started rolling:
In the beginning, there were planks:
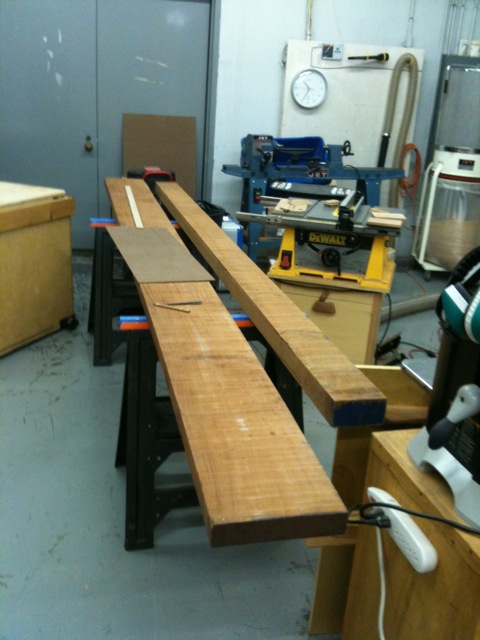
These planks were the most beautiful, clear, straight grained mahogany planks I’ve ever worked with.
One was 8/4 (for the treads and risers) the other was 12/4 (for the upright/handle).
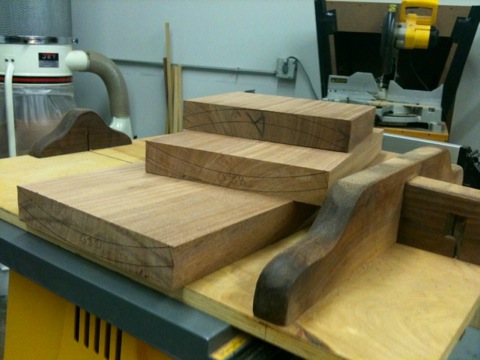
I wanted the grain pattern to “drip over the edge” of the tread and down the riser. So I laid out a tread and a riser, cut that from the plank. Then laid out the next tread and riser, and cut that out....
Here are the collected risers. They would require the full thickness of the 8/4 plank to define their curve.
I hated to see this much waste of beautiful mahogany but I could not think of any other way to make it. You certainly could not bend the wood along the grain and I really wanted that grain pattern.
So, I took a trammel (a very simple one, I’ll try to point it out in a photo coming up) and marked the curve (a 15-1/2” outer radius and a 14-3/4” inner radius).
Then a few passes across a table saw to establish a few kerfs:
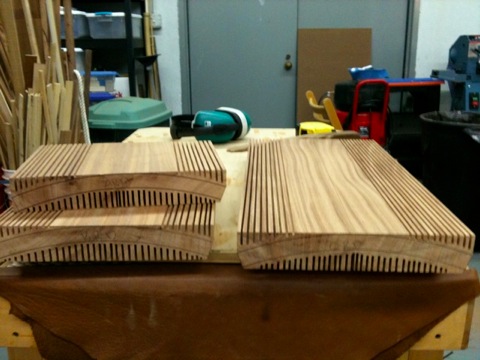
The kerfs served as reference depth cuts. Then I grabbed my trusty Buck Bros. 1-1/2” butt chisel and started removing everything between the kerfs.
On the outside, a draw knife followed by block planes and I had a pretty respectable curved outer surface.
The inside was more of a challenge. Without a concave plane, I was left to draw across it with a small curve-soled spoke shave until I was close enough that a curved card scraper could take me home. (sorry, no in-progress pics of all this. Must have been having too much fun!)
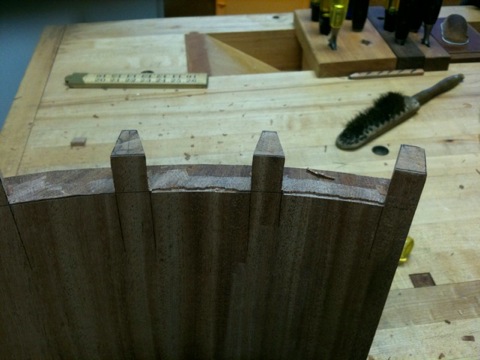
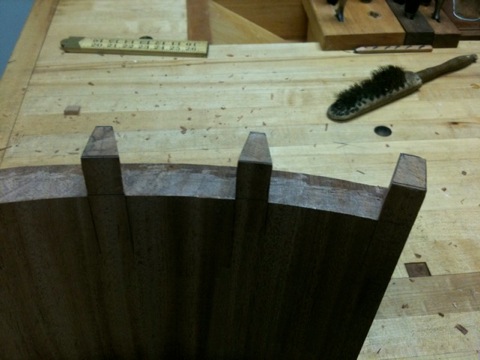
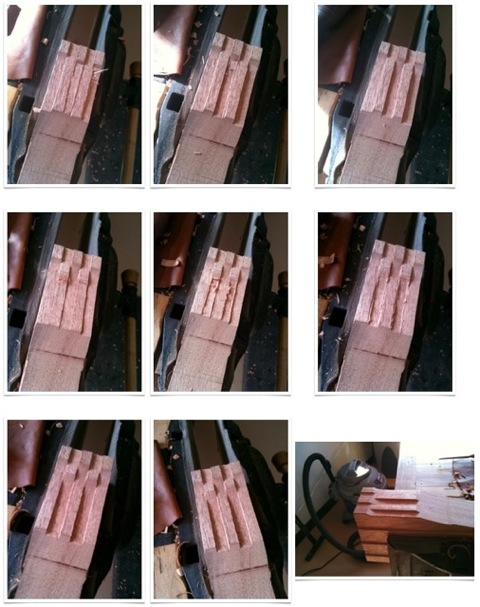
Further evidence that I am a “Pins First” disciple of dovetailing. The layout of the pins was pretty much like any straight line dovetails: Evenly space the centers of the pins, strike out the slopes of the pins with half pins on the ends (the exact angle really didn’t matter - if they looked good by eye, they looked good - the tails would be marked from the pins).
After some bandsaw, fret-saw, and chisel work, I was ready to cut the final paring cut to define the shoulders of the pins:
Some light paring work later and we’re ready to mark the tails:
But before we go there, we need to do some preliminary shaping of the risers:
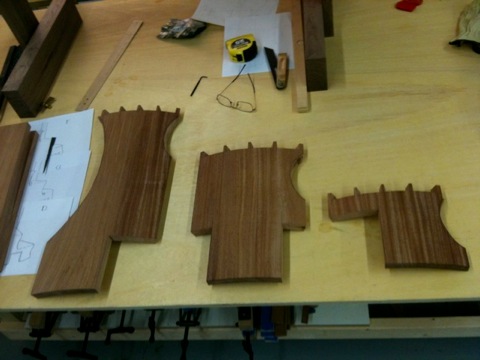
This was done primarily on the bandsaw.
Next it became important to get the bevels on the sides of the risers just right to define a 15-1/2 “ radius.
For me, that meant drawing the radius on a scrap of MDF and setting the piece together and removing whatever was in the way:
Now, I can set all this aside and start working on the upright:
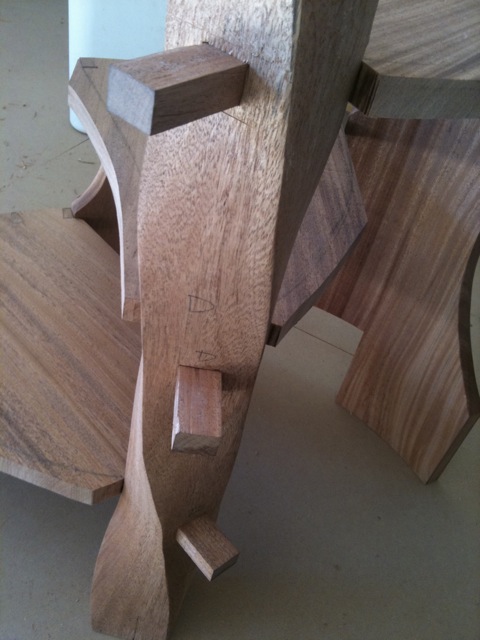
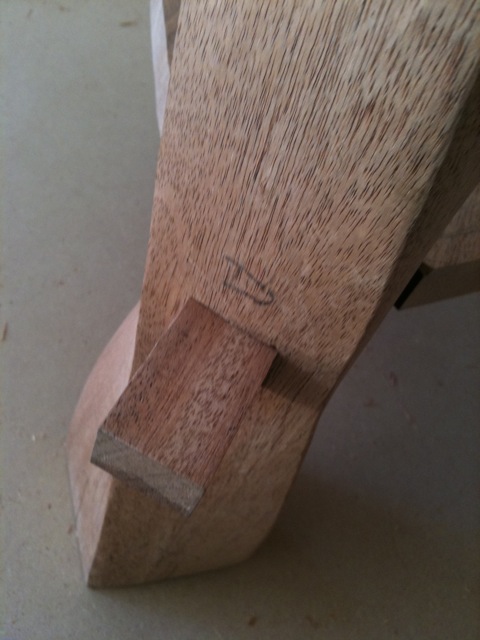
The process in the photos below may seem a bit savage but there is a method to the madness. The first objective was to cut the mortises. These were straight forward enough. The lowest one was cut straight. The middle one at 45 degrees and the top at 90. The middle one provided the challenge. Let’s just say it needed more hand work than the others.
The second objective was to define the surfaces where the treads would meet the upright. This was a saw and pare type of operation.
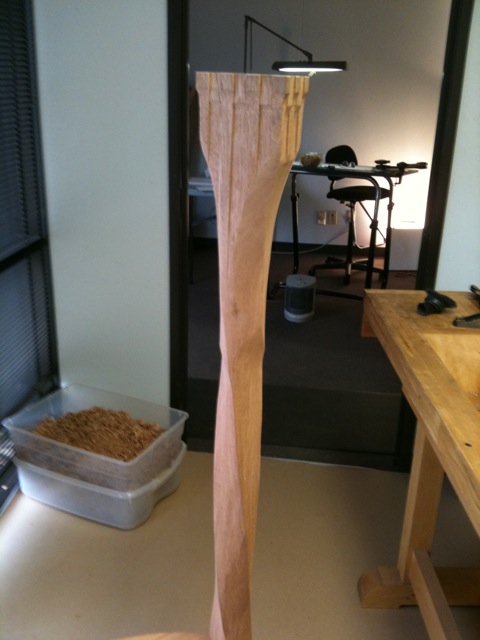
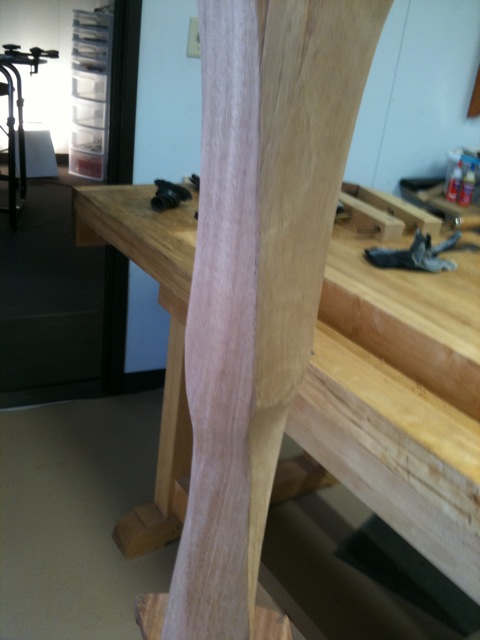
The final objective was to define the spiral down the full length of the upright.
You can click on the photo below to look at close ups of each photo and you can kind of see how each of these steps play out.

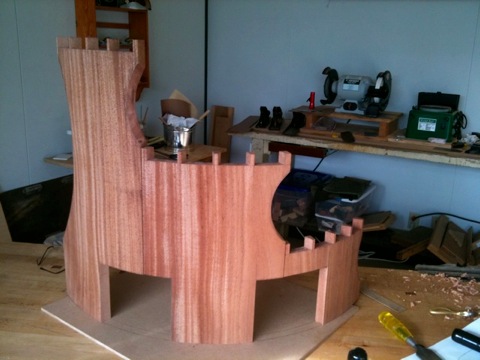
Now the spiral is more or less complete:
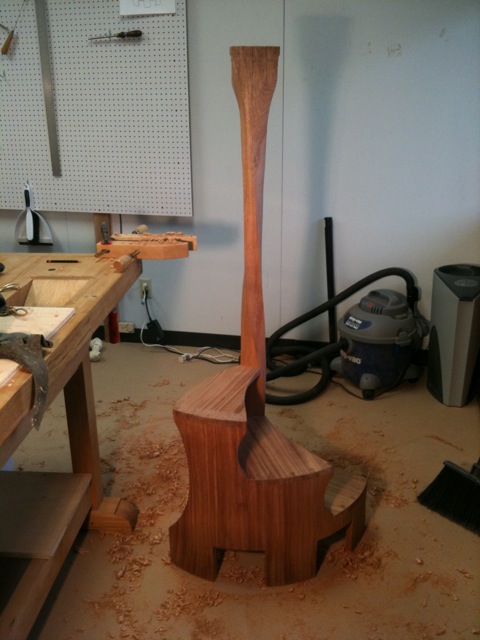
And the treads are fit into the risers and the treads are fit into the upright. Things are taking shape now!
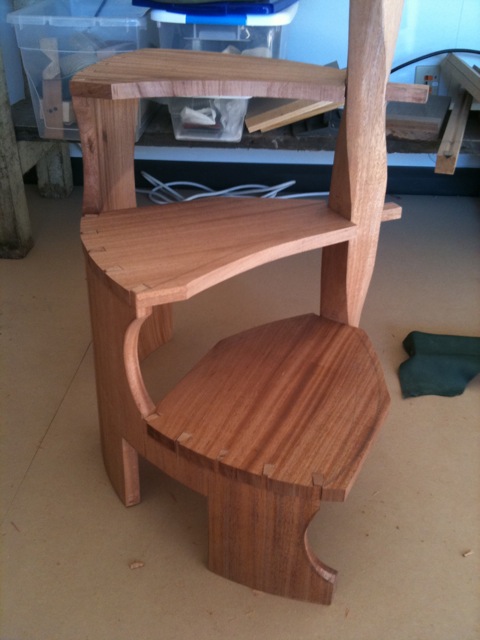
Taking shape and fitting together:
And fitting well:
Now it’s on to the head (or handle):
I’m probably more enamored by the following shots than I should be but I just love the way this carving took shape. Again, you can click on the photo to see enlarged details. (if you’re interested...)


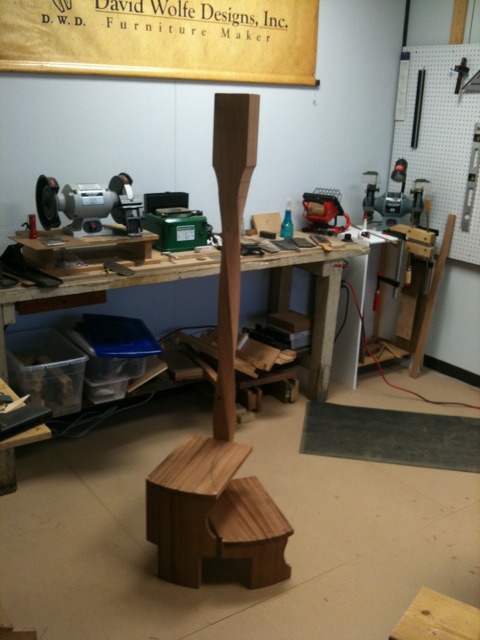
Now, after all that carving here’s the thing that drives me (and probably more so, my wife) crazy!
The head is too large for piece:
And at one point, I thought that a “handle” in the middle of the upright would be helpful in picking it up.
It was, but the lines just didn’t fit the piece. alas...
So, more carving! Fist the handle disappeared (and along with it, more weight disappeared):
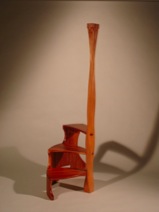
Then the head had to go through a similar “reduction” plan, which gave us the the final form:
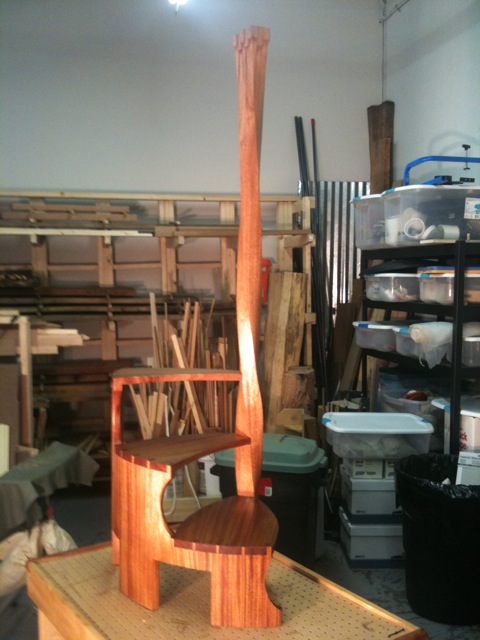
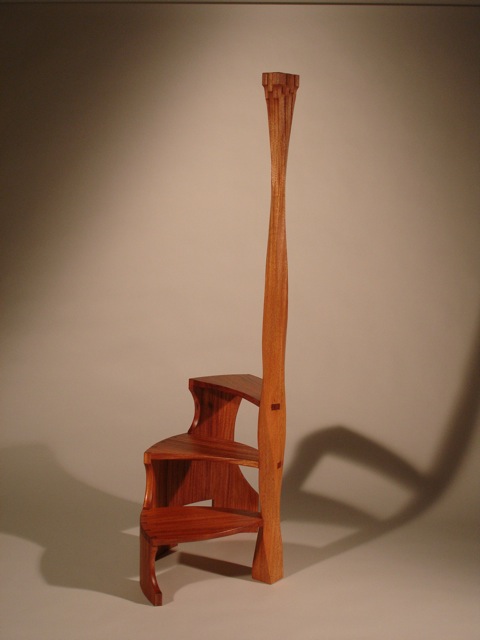
And after some hand rubbing with boiled linseed oil the puppy is ready for work:
[ Back to top ]
I guess you could say that this project began with a showing at the Piedmont Craftsman’s Fair. I was fortunate enough to be invited to join this group of exhibiters after a jury process. The client saw my work there and wanted a step ladder for her library. (I have one photo of the ladder she saw there. You can see it in the gallery - scroll down to “Step Ladder”, not “Ellen’s Step Ladder” to see what she saw at the show). I had two ladders exhibited at the show and both had already sold but I told her I’d be happy to build another for her. That suited her well as she wanted to change the design a bit. That suited me well as I am always happy to let a design evolve to fit a client’s desire/whim/expectation.
So, after ironing out a few details, work began with photo tour of the room in which the ladder was going to live. In this case it was a library with beautiful hand-rubbed mahogany panelling. Dentils lined the top of the panels. There were also photo’s of some of the furniture in the room. I was able to draw some inferences from all of these elements. It is a beautiful room and I am excited to be able to add a piece of furniture into it.
Now we needed to get down what kind of changes she wanted to make. I knew that she wanted to “tame up” some of the lines of the top (the handle). To keep the piece internally harmonious, I knew that would mean some changes to the bottom as well. So, I submitted these drawings to get things started.
She gravitated toward sketch “D” but before we moved on, I wanted to see if a more literal translation of the dentils would be any more appealing (“F” and “G”). The larger, less literal interpretation of the dentils (“D”) won the day and that’s what we went with. Sometimes you have to push past an idea before you realize you had it right in the beginning. (at least sometimes _I_ do!).
I kind of got the imagery of a rook or castle on a chess board from this sketch (“D”). When I shared this with Ellen, she concurred and kind of liked that imagery. Playing on this idea, I came up with a design for the top of the upright or the handle:
...and with this in hand, I started rolling:
In the beginning, there were planks:
These planks were the most beautiful, clear, straight grained mahogany planks I’ve ever worked with.
One was 8/4 (for the treads and risers) the other was 12/4 (for the upright/handle).
I wanted the grain pattern to “drip over the edge” of the tread and down the riser. So I laid out a tread and a riser, cut that from the plank. Then laid out the next tread and riser, and cut that out....
Here are the collected risers. They would require the full thickness of the 8/4 plank to define their curve.
I hated to see this much waste of beautiful mahogany but I could not think of any other way to make it. You certainly could not bend the wood along the grain and I really wanted that grain pattern.
So, I took a trammel (a very simple one, I’ll try to point it out in a photo coming up) and marked the curve (a 15-1/2” outer radius and a 14-3/4” inner radius).
Then a few passes across a table saw to establish a few kerfs:
The kerfs served as reference depth cuts. Then I grabbed my trusty Buck Bros. 1-1/2” butt chisel and started removing everything between the kerfs.
On the outside, a draw knife followed by block planes and I had a pretty respectable curved outer surface.
The inside was more of a challenge. Without a concave plane, I was left to draw across it with a small curve-soled spoke shave until I was close enough that a curved card scraper could take me home. (sorry, no in-progress pics of all this. Must have been having too much fun!)
Further evidence that I am a “Pins First” disciple of dovetailing. The layout of the pins was pretty much like any straight line dovetails: Evenly space the centers of the pins, strike out the slopes of the pins with half pins on the ends (the exact angle really didn’t matter - if they looked good by eye, they looked good - the tails would be marked from the pins).
After some bandsaw, fret-saw, and chisel work, I was ready to cut the final paring cut to define the shoulders of the pins:
Some light paring work later and we’re ready to mark the tails:
But before we go there, we need to do some preliminary shaping of the risers:
This was done primarily on the bandsaw.
Next it became important to get the bevels on the sides of the risers just right to define a 15-1/2 “ radius.
For me, that meant drawing the radius on a scrap of MDF and setting the piece together and removing whatever was in the way:
Now, I can set all this aside and start working on the upright:
The process in the photos below may seem a bit savage but there is a method to the madness. The first objective was to cut the mortises. These were straight forward enough. The lowest one was cut straight. The middle one at 45 degrees and the top at 90. The middle one provided the challenge. Let’s just say it needed more hand work than the others.
The second objective was to define the surfaces where the treads would meet the upright. This was a saw and pare type of operation.
The final objective was to define the spiral down the full length of the upright.
You can click on the photo below to look at close ups of each photo and you can kind of see how each of these steps play out.
Now the spiral is more or less complete:
And the treads are fit into the risers and the treads are fit into the upright. Things are taking shape now!
Taking shape and fitting together:
And fitting well:
Now it’s on to the head (or handle):
I’m probably more enamored by the following shots than I should be but I just love the way this carving took shape. Again, you can click on the photo to see enlarged details. (if you’re interested...)
Now, after all that carving here’s the thing that drives me (and probably more so, my wife) crazy!
The head is too large for piece:
And at one point, I thought that a “handle” in the middle of the upright would be helpful in picking it up.
It was, but the lines just didn’t fit the piece. alas...
So, more carving! Fist the handle disappeared (and along with it, more weight disappeared):
Then the head had to go through a similar “reduction” plan, which gave us the the final form:
And after some hand rubbing with boiled linseed oil the puppy is ready for work:
[ Back to top ]